
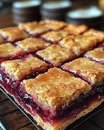
f you’re craving a dessert that’s sweet, fruity, and easy to make, Cherry Pie Bars are the perfect solution! These bars feature a buttery, shortbread-like crust topped with sweet cherry filling and a crispy, crumbly topping. They’re a fun and convenient twist on classic cherry pie, and they make a great addition to any dessert table. Whether you’re serving them for a family gathering, picnic, or holiday celebration, these cherry pie bars are sure to impress.
Why You’ll Love Cherry Pie Bars
✔ Easy to Make – No need to fuss with pie crusts! These bars are simple to prepare and bake.
✔ Perfect for Any Occasion – From casual family dinners to special holidays, these cherry pie bars are a hit for any event.
✔ Deliciously Sweet – The combination of tart cherries and a sweet, buttery crust makes every bite irresistible.
✔ Customizable – You can adjust the sweetness, make it with fresh or canned cherries, or even try different fruits!
Ingredients
For the crust and topping:
2 cups all-purpose flour
1/2 cup granulated sugar
1/2 teaspoon baking powder
1/4 teaspoon salt
1 cup (2 sticks) unsalted butter (cold and cut into cubes)
1 large egg (beaten)
For the cherry filling:
1 can (21 oz) cherry pie filling (or use fresh or frozen cherries)
2 tablespoons cornstarch
2 tablespoons lemon juice (optional, for a little extra zing)
1 tablespoon granulated sugar (optional, depending on sweetness preference)
Instructions
Step 1: Preheat the Oven
Preheat your oven to 350°F (175°C). Line a 9×13-inch baking pan with parchment paper or lightly grease it with cooking spray.
Step 2: Make the Crust and Topping
In a large bowl, combine the flour, sugar, baking powder, and salt.
Add the cold butter cubes and use a pastry cutter, fork, or your fingers to blend the butter into the dry ingredients until the mixture resembles coarse crumbs.
Add the egg and stir until the dough starts to come together. It will be crumbly, but that’s okay!
Press about 2/3 of the dough into the bottom of your prepared baking pan to form the base. This will act as the bottom crust.
Step 3: Prepare the Cherry Filling
If you’re using canned cherry pie filling, just spread it evenly over the crust.
If you’re using fresh or frozen cherries, add them to a saucepan with 2 tablespoons of sugar (if using), lemon juice, and cornstarch. Stir everything together and cook over medium heat, stirring occasionally, until the mixture thickens and becomes bubbly. This should take about 5-7 minutes.
Once your cherry filling is ready, pour it evenly over the pressed dough crust in the pan.
Step 4: Add the Topping
Crumble the remaining 1/3 of the dough over the cherry filling. You want to create a rustic, crumbly topping that will bake into a golden, crispy layer.
If desired, sprinkle a little sugar over the top for extra sweetness and a slightly crunchy finish.
Step 5: Bake
Place the pan in the preheated oven and bake for 40-45 minutes, or until the top is golden brown and the cherry filling is bubbling.
Once baked, remove from the oven and let it cool completely in the pan on a wire rack before cutting into bars.
Step 6: Serve and Enjoy
Once the bars have cooled, cut them into squares and serve! They can be enjoyed as-is or with a scoop of vanilla ice cream or whipped cream for extra indulgence.
NEXT
ADVERTISEMENT
