
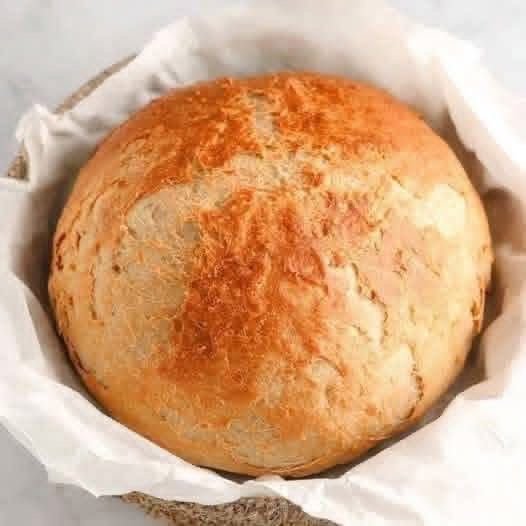
Achieving that perfect crusty loaf is all about understanding a few key principles and having a few tricks up your sleeve. The beauty of no-knead bread lies in its simplicity, but these tips will help ensure every bake is a triumph. First and foremost, resist the urge to knead! The long fermentation process is doing all the gluten development for you. Over-handling the dough, especially after the first rise, can deflate it and lead to a denser loaf. Treat it gently, as if you’re handling a cloud.
Dough consistency is another vital aspect. Your no-knead dough should be very wet and sticky, almost like a thick batter rather than a traditional bread dough. This high hydration is what contributes to the open, airy crumb and the crispy crust. If your dough feels too dry, you might need to add a tablespoon or two more water in the initial mixing stage, though always err on the side of sticky. Conversely, if it’s excessively soupy, a tablespoon of flour can be added. Remember, humidity and flour type can affect absorption, so a slight adjustment might be necessary.
The proofing time is flexible and temperature-dependent. The 12-18 hour range for the first rise is a guideline. In a warmer kitchen, your dough might be ready in 10-12 hours, while in a cooler environment, it could take up to 20 hours. Look for visual cues: the dough should be visibly bubbly, have risen significantly (at least doubled), and show signs of activity. Don’t rush it! A slow, long fermentation is key to flavor development. For the second rise, a shorter period of 30-60 minutes is usually sufficient, just enough for the dough to relax and puff slightly before baking.
The Dutch oven is your best friend for this recipe. Its ability to trap steam creates the perfect environment for a spectacular crust and a good oven spring. Always preheat your Dutch oven inside the oven for at least 30 minutes at the full baking temperature. This ensures it’s scorching hot when the dough goes in, which is critical for that initial burst of rise and the formation of a crisp crust. Safety first: use heavy-duty oven mitts when handling the extremely hot Dutch oven.
For an even crisper crust, consider placing a small pan of hot water on the bottom rack of your oven during the lid-off baking phase. The additional steam can further enhance crust development. Additionally, don’t skimp on the cooling time. It’s truly difficult to resist slicing into a warm loaf, but cooling completely allows the internal structure of the bread to set and prevents a gummy texture. The steam inside the bread needs to escape, and the starches need to firm up. Patience is rewarded with an ideal texture and flavor.
While the image doesn’t show it, scoring the dough before baking is an optional but rewarding step. A quick slash with a sharp razor blade or knife allows the bread to expand in a controlled manner, preventing uncontrolled tearing and adding to the rustic aesthetic. A simple cross or a single deep slash down the center are common choices. Dusting the dough with a little extra flour just before baking also enhances the artisan look, creating a beautiful contrast against the golden crust.
Experiment with flavor variations to truly make this recipe your own. For a savory twist, try adding 1 tablespoon of finely chopped fresh rosemary and a quarter cup of grated Parmesan cheese to the dough. Sun-dried tomatoes, olives, or even caramelized onions can also be folded in during the initial mixing. For a seeded loaf, incorporate a few tablespoons of mixed seeds (sesame, poppy, flax) into the dough, and sprinkle some on top before baking. A touch of whole wheat flour (substituting up to 1 cup of the all-purpose flour) can add a nutty depth and a slightly denser texture. The possibilities are endless, making this versatile recipe a fantastic canvas for your culinary creativity.
Storage and Reheating
To maintain the freshness and delightful texture of your homemade No-Knead Artisan Bread, proper storage is key. The enemies of fresh bread are air and moisture. Once the bread has completely cooled (this is critical!), store it at room temperature. The best way to store a whole or partially sliced loaf is in a breathable bag, such as a paper bag or a clean linen bread bag. This allows some air circulation while preventing it from drying out too quickly. Avoid airtight plastic bags for the first day or two, as they can trap moisture and soften the crust, making it less crispy. Stored this way, the bread will retain its quality for 2-3 days.
For longer storage, especially if you won’t consume the entire loaf within a few days, freezing is your best option. Slice the cooled bread into individual portions or half loaves. Wrap each portion tightly in plastic wrap, then place them in a freezer-safe bag or aluminum foil. This double-layer protection helps prevent freezer burn. Frozen bread can be stored for up to 3 months. When you’re ready to enjoy it, simply thaw slices at room temperature or pop them directly into a toaster. For a larger piece, thaw overnight in the refrigerator or on the counter, then refresh in the oven.
Reheating your artisan bread can bring back much of its fresh-baked glory. For a whole or half loaf, preheat your oven to 350°F (175°C). Lightly dampen the crust of the bread with a little water (you can use a spray bottle or just quickly run it under the tap). Place the bread directly on the oven rack and bake for 10-15 minutes, or until the crust is crisp and the interior is warmed through. This method works wonders for reviving that delightful crunch. For individual slices, a toaster or toaster oven works perfectly, crisping up the exterior and warming the interior in just a few minutes.
Frequently Asked Questions
Why is my bread dense and not rising enough?
Several factors can contribute to a dense loaf. The most common reasons include using old or inactive yeast, not allowing enough time for the first rise (especially if your kitchen is cool), or over-handling the dough when shaping, which can deflate the air bubbles. Ensure your yeast is fresh and active, and always allow the full 12-18 hours for the bulk fermentation, adjusting for ambient temperature. Also, be gentle when transferring and shaping the dough.
Can I make this recipe without a Dutch oven?
While a Dutch oven is highly recommended for achieving the signature crust and texture, you can bake this bread without one. You’ll need a heavy-bottomed oven-safe pot with a tight-fitting lid, like a cast iron pot or a ceramic casserole dish. Alternatively, you can use a baking stone or a heavy baking sheet. If using a stone/sheet, place a pan of hot water on the bottom rack of your oven during baking to create steam, which is crucial for crust development. Bake at 450°F (232°C) for the full duration, but you may need to adjust the timing slightly as the steam environment won’t be as controlled.
How do I achieve a super crispy crust?
A super crispy crust is primarily achieved through two methods: high heat and steam. The Dutch oven method excels at this by trapping steam around the loaf during the initial bake. Ensure your Dutch oven is preheated thoroughly to 450°F (232°C) for at least 30 minutes before adding the dough. Baking with the lid on for 30 minutes, then removing it to allow the crust to brown and crisp up, is key. Additionally, ensuring the bread cools completely on a wire rack is vital; slicing hot bread can trap steam and soften the crust.
Can I prepare the dough ahead of time and bake it later?
Yes, you can! After the first rise, you can gently shape the dough and place it in a floured bowl or proofing basket. Cover it tightly with plastic wrap and refrigerate for up to 2-3 days. When you’re ready to bake, take the dough out of the refrigerator and let it come to room temperature for about 1-2 hours while your Dutch oven preheats. This cold proofing can actually enhance the flavor of the bread even further, developing a more complex, slightly tangy taste.
ADVERTISEMENT
